
Configuration of an EMCOMM Power Supply |
|
If you are simply a concerned citizen with a ham radio license, you should read this: Minimal, Individual Preparation for EMCOMM This article is about serious preparations for emergency communication. Contents
If you want to do emergency communication (EMCOMM) as a radio amateur, you need a suitable emergency power supply. The easiest way is to operate your handheld FM transceiver with external, possibly rechargeable, batteries. If you want to do a little more, you will quickly end up with a solar power system. Tips on how to build emergency power supply is available in a separate chapter (not yet translated). Solar modules are particularly important if you want to use the special advantage of amateur radio: After 2-3 days off-grid, the communication networks of the emergency bodies should be quite at the end because the diesel for the power unit gets scarce. I do not believe that the replenishment works without a functioning power grid:
If you complement the battery with solar modules, off-grid operation is practically possible for unlimited times. If you want to do the rest, you can buy an emergency generator of the 1-kW class for EUR 300 and a charger for 100 EUR. So you can reload the battery every few days. However, an emergency generator must be serviced regularly. What I describe here is based on several years of experience. I started working on my first experimental system in 2017, using old solar modules and lead-gel batteries. In the meantime I switched to LFP batteries. Their prices came down considerably, making any lead technology not worth considering – at least on the long run. See also the references on the left in the navigation column. First Step: Define Electricity Requirements and Operating TimeParticipation in EMCOMM with handheld FM Transceiver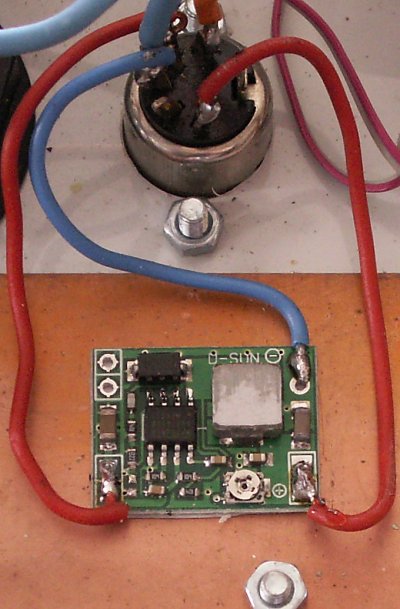
A handheld transceiver should often be enough to reach the next relay. During reception, such a unit needs maybe 100 mA at 7.2 V. During transmission it quickly reaches 2 A – depending on the required transmission power. At 10% TX this means 0.3 Ah per hour, based on 7.2 V. If you take a lead-gel battery of the 20 EUR class, i.e. 12 V/7 Ah, you can use about 4 Ah. A small switching regulator as in the picture reduces the power consumption from the battery to about 0.2 Ah/hour. So you get around 20 operation hours from the battery. If you assume 5 standby periods of 10 minutes each day, this means less than 1 operating hour a day. So you can take part in the EMCOMM network for 20 days if no further activities are necessary. Participation in an EMCOMM Network With a Mobile TransceiverThere are reasons to do EMCOMM with a mobile transceiver, from connecting the station antenna to greater transmission power to special functions, such as cross-band relays. But this means a significantly higher power consumption. Lets estimate 500 mA RX and 6 A TX, everything on a 12 V basis. This means at a 12-V consumption of about 1 Ah/hour – factor 5 more than with the hand TRX. The above battery would be discharged after 4 days. If you drive the battery to wear, you get a week. If the radio still works under 11 V. If one assumes that the disaster protection services only remember us after the breakdown of their own communication infrastructure, that is not enough. After all, you could have done welfare traffic by then, that is transporting information for the population. Operation of a Simple FM RelayI see no crucial reason why a simple relay should consume much more electricity than a mobile station. I see the difference more in the operating time and thus the necessary battery capacity. The control could easily be done by an Arduino or a small Raspberry Pi. My suggestion is to equip relays for at least 20 days of off-grid operation. Solar operation can expand the operating time almost arbitrarily. At 12 V/1 A that means 12 V/500 Ah! In LFP technology this would cost around 1000 EUR. However, this can be significantly reduced:
Integrating the relay into a network using HAMNET methods requires only a slightly larger power supply. Dimensioning of Solar Modules and BatteriesOnly in very sunny areas with more than 300 sun days a year or so, a solar installation can provide energy year round. But solar modules can extend the operation time of emergency equipment considerably. The following observations were made in southern Germany, 50 km north of the Alps. For Germany, this is a relatively sunny area. On the other side I have to cope with quite some shadows, not only from 20 m high trees 25m south of my house. You should consider that even minimal shadows on your solar modules can cost you 50-90% of the output as a single wafer (single silicone sheet) can define the current through the whole solar module. 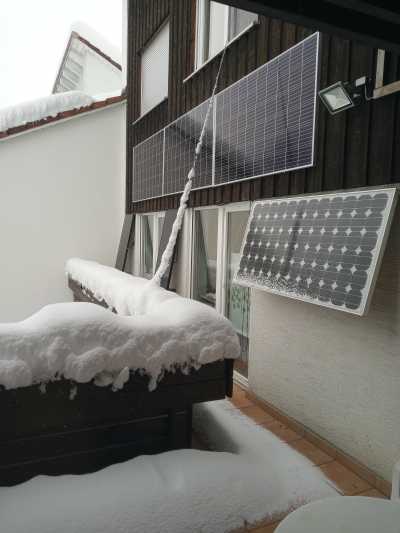
If you dimension your solar system this way, you should be able to operate your emergency equipment 24/7 from March to October from solar only. During the winter you can operate the emergency equipment for at least 8-14 days. Only if the emergency might last longer you would have to limit operating hours. I need around 20 kWh/year to bridge the winter gap, for the shack and the fridge. A small gas generator could fill the gap for a few 100 EUR while 20 kWh of battery storage would cost several 1000 EUR. You can compute that my installation conforms to the lower limits of this guideline.
Using LFP BatteriesFor decades, lead-based batteries were the obvious choice for nearly all larger batteries. These days AGM batteries and their variants are only interesting under a few specific conditions:
For about all other applications the chemistry of choice is something based on lithium. For larger, stationary systems LFP (LiFePO4) is the technology of choice: Relatively bulky and heavy, but stable and relatively cheap. If lithium batteries burn or explode they are nearly always based on lithium ion or lithium polymer technology. To destroy LFP batteries you must either crush them mechanically or deeply discharge them. Most disuse is limited by their battery management systems. There are two ways to destroy them: 
There are quite some uncertainties about charging LFP batteries. It all starts with their flat discharge voltage. You can reliably recognize only two states: completely full or completely empty. For everything in between you need a battery monitoring system that measures the battery current very precisely and integrates it over time. Precisely is key as you need a very wide dynamic range:
Quite some myths exist on how to recognize when a LFP battery is full. The diagram on the right is from real life: In winter, around noon, a gap in the shadows of the trees south of my garden wanders over the two solar modules feeding the 300 Ah batteries in the cellar. The day before I had charged these batteries up to -24 Ah, only feeding the rig through the 12 V line. In the morning charge was down to -34 Ah. Coincidentally the power boost charged the batteries nearly to the brink. The power surge (red) with up to 30 A raised the battery voltage to about 13.7 V. The most interesting thing happened later: The highest battery voltage (blue) came later, with much lower charging currents. This is what makes it so difficult to estimate the charge of LFP batteries. This is where battery monitoring calibrates to "battery full". This diagram also shows why I set the maximum charge voltage to 13.9 V at a rated maximum battery voltage of 14.5 V: The charge difference would be minimal. It would also mean that the shack computer would be powered with more than 14 V instead the rated 12 V. But I could not go much lower as the battery balancer must be able to do its job, too. It needs more than 13.6 V to decide which cells are fully charged and which are not. Using the Emergency Power Supply for the QTHThis chapter is provided as a reference for your own installations. It describes the different components, their purpose and their usage. If you are already setting up an emergency power supply: Why should you set it up just for hobby use and the unlikely event of an emergency? For this reason, at the end of February 2022 (why then?), I considered a larger power supply. I wanted to have at least 500 Wh/day available under all possible conditions, despite the rather unfavorable conditions. See image: 
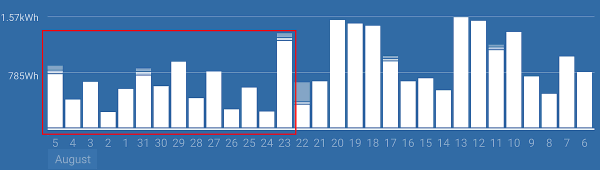
Output of two 335 Wp solar modules vertically on the house wall July/August. 
State of charge (blue, 100% = 240 Ah) Based on my experience with my old experimental system, I purchased the following components:
The design decision for 12 V was made to reduce losses around the ham radio station. The 2 kW inverter exposed the limits of a 12 V system: 2 kW means more than 150 A to the inverter. To limit losses I had to dimension this current path with 32 mm2 (AWG2). I have a 12 V line between both systems. With a switching regulator I can push energy from one system to the other. For some time I had LFP batteries in the basement and AGM (lead) batteries in the shack. The voltage level of the AGM batteries is generally lower that that of LFP batteries, especially when the AGM batteries are mostly depleted. Through the 0.4 Ω of the line I got up to 1.5 A charging current to the AGM batteries. Bottom line: From end of February to begin of November I can power shack and fridge completely from solar. For the rest of the year I need 10-20 kWh of grid power. For normal operation I do not use the lowest third of charge. At all times I can operate the station for at least 24 hours without any solar energy. Why DIY and not a Power Station?DIY saves you hardly any money, but it does give you more flexibility. If you follow evaluations of power stations on tech-savvy YouTube channels like DIY Solar Power with Will Prowse, they are usually poorly suited for our purposes:
I also do not want to hide the fact that I also see the whole construction as an appropriate toy for a retired electronics engineer :-) 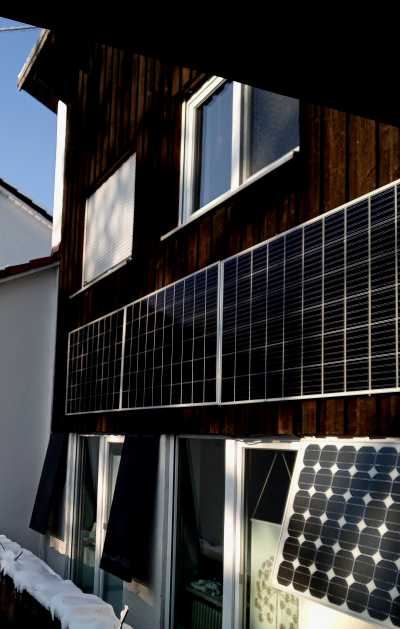
Why not Just a Proper Solar System?Warning! Even setting up my solar system required a certain amount of specialized knowledge, from the generator junction box to double-insulated cables to grounding. Anyone who wants to make any changes to their large solar system should only have it done by a qualified electrician. In my case, this is due to the trees that tower into the sky south of my property line. From the beginning of November until February, all suitable roof surfaces are in shade. The roof visible in the picture belongs to my neighbor, but mine does not look any better. The ridge is just not visible. I cannot harvest more than a few hundred Wh/day under these circumstances. It would be a bit better with solar modules mounted several meters higher. I did not want to go through the hassle of scaffolding, etc. Most grid-connected solar systems are unsuitable for emergency purposes: The solar modules only power the inverter. As soon as the power grid fails, these systems are dead, even if they contain batteries, because the batteries are only connected to the grid. The alternative is a power path from the solar modules via a charge controller directly to the batteries and from there to an inverter. The system should be able to feed into the power grid and also independently power the house after switching over. The simplest option is to connect a standalone inverter to the batteries, which then supplies power to individual devices: a refrigerator not defrosting during a power outage, or the shack, are good options. |
|
Alexander von Obert * http://www.dl4no.de/thema/configur.htm Letzte Änderung: 28.12.25 (added chapter 'Using LFP...') |
EMCOMM
| EMCOMM Basic Facts |
| Information Gathering and Distribution |
| Minimal, Individual Preparation for EMCOMM |
| Configuration of an EMCOMM Power Supply |
| Computers for EMCOMM |
| Three Years 'EMCOMM Ready' |